Digital dawn
First of all, before I get into why I have this or that bit of kit, note that none of this involves chemical film. Negative print film still has bags more resolution than digital, and handles highlights better. However, I would never have taken up photography if you still had to send away rolls of exposed chemical film. By the time I’d have seen the results, I’d have forgotten what I was trying to achieve, or what I did to take the shot (and hence what I probably messed up). The instant feedback of a digital camera allowed me to see very quickly the difference between several shots, all of the same scene, but done with different light, aperture, focus etc. Yes I know some film cameras record a sort of EXIF equivalent that you could match up with each frame later, but even so. Now I know a bit about how to expose and focus an image, I could put up with the wait, however, as this isn’t a full time occupation for me, and I don’t need bags of resolution (nobody does to be honest – you don’t look at an A0 print from 10 inches away) and time is more limited now than ever, I still can’t see me taking up a film camera any time soon.
My Current kit.
Cameras

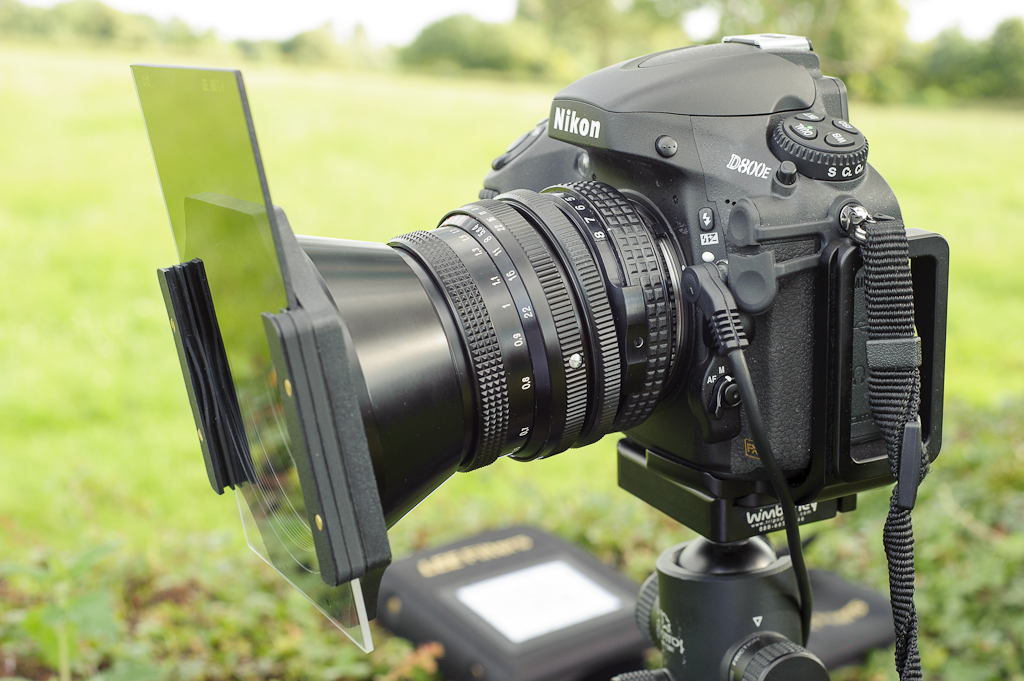
Right now and for the last 2 years or so I’ve been using a Nikon D800E. Making use of the extra pixel density is a challenge, however it does all come to life in the studio with perfect light and short flash durations. Noise performance slightly better than D700, and the E version has no low pass filter (well a nullified one anyway). I don’t see any point in buying a camera who’s party trick is resolution and detail, and then buying the version with the blurry filter on it. Moire as an issue for photographers is a myth – it’s not troubled me in the 2-3 years I’ve shot my D800E. Seems Nikon agrees as almost all of their new cameras have no low pass filter now. Of course back then I had to pay £400 more for the privilege of having a de-blurred camera. In normal use of course, the difference is not visible, but on a big print, or crop it is an advantage to have all the sharpness you can.
Nikon D700 – my previous camera. A good all round machine – very reliable in all temperatures. I used my D700 down to -17 degrees Celsius, and the only problem was my finger sticking slightly to the shutter release button. I wish it did more than 1 stop between bracketed shots. I wish it didn’t lower and raise the mirror between bracketed shots – even on continuous shooting. Apart from that, I quite like it. It’s main party trick is being able to take pictures in the dark. Well almost. The low pixel count (12Mp) on a 36mm sensor means low noise, even with the gain ramped up to ISO5000 it’s usable and at ISO 1000 it is remarkable. I sold the D700 to a friend.
Nikon D200 – I kept my D200 when I swapped to a 35mm camera, as all of my telephoto lenses suddenly had 1.5 times less reach and it’s worth less than a new telephoto zoom or tele-converter set. I use it with my 70-300 for motor-sport, and carry the D700 with a wider lens for paddock shots. I also use the D200 body for macro shots as it gets 1.5 times more working distance out of my 105mm macro lens. Its also useful to have a second body for set-ups that will take time to build. If I use my D200 for those, I can leave it set up.
Lenses
Nikon 50mm 1.8AF-D – everyone Nikon user should have one of these (or the more expensive 1.4..). They are Nikon’s cheapest and one of the sharpest lenses you can buy. Great for limited depth of field shots.
Nikon 70-300mm AF-S G VRII- Mid range telephoto zoom. A great lens this for the price. Not a fast lens, however the VR helps, and mounted on the D700, the high “ISO” capabilities can compensate with moving subjects. Use this for motor-sport, where panning shots demand a low shutter speed (1/100 typically) and around f/8 anyway. Also for other fast moving objects, like the kids. This is my go-to lens in the studio – even on my D800E, it is sharp at 100% – a miracle for the price.
Nikon 28-300mm AF-S G VRII super-zoom. This is my travel lens. Since getting this lens, I don’t carry a bag when out and about – just my camera with this lens, spare battery and cards, and sometimes I take the little 20mm in my pocket as well. Camera on the black rapid strap – shoot all day long. Close focus is impressive too.
Sigma 24-70mm f/2.8 DG Macro – Lazy lens, although very good for the price. AF a bit slow due to the mechanical drive, but optics very good. I use this less and less these days however it’s a good fall-back option. Quite heavy though. The focus and zoom rings go in the opposite direction to Nikon lenses which still trips me up occasionally. Its not really a macro lens despite the name, although it will focus pretty close at 15.7 inches.
Sigma 105mm f/2.8 DG Macro – a decent short telephoto macro lens – bought second-hand via eBay. I don’t do a lot of Macro, however this lens performs well. No focus motor (uses camera body AF motor), although I find the focus is best done moving the camera anyway for macro shots. This is also a very sharp 105mm lens – and very good for portraits.
Nikon 14-24mm f/2.8 AF G – A great set of optics, although heavy and cumbersome to use. The Lee filters for this lens are huge, and only a limited set are available (no 10 stop for eg).
 Nikon 20mm f/2.8 AIS – a 26 year old manual focus, mechanical lens. One of my favourites. Very light, sharp and easy to use and carry, plus it works with all my regular size Lee filters. I take this rather than the 14-24mm if I’m travelling by air. Bought second hand via eBay for £234. This lens is a great combination with the D700 for portable hand-held wide angle shots. I took all the night shots in Canary Wharf with this combo wide open at ISO 1000. It’s also light enough to sit on my tiny Slik Sprint-Mini tripod that I can carry on my belt..
Samyang 800mm f/8 mirror. A great way to mess around with incredibly long focal lengths for no money. No AF, fixed at f/8 and no VR, make it a challenging “lens” to use. High shutter speeds are required, and pre-focussing is advised for moving subjects. It produces a low contrast image which needs some adjustment (I have a Lightroom preset for this) and the bokeh is pretty disturbing if the background is busy, being made up of lots of tiny doughnut shapes. Still, it’s light, cheap and does produce a sharp image at 800mm for less than £200.
Nikon 85mm f/1.8 AF-D – nice portrait lens – and much cheaper used than the 85mm f/1.4. I use this mainly for portrait work.
Zeiss Flektogon 50mm f/4. This ~50 year old lens was originally made for the East German/Russian Pentacon 6 medium format camera. I attach it to my D800E via a tilt adaptor, to make a titling 50mm lens. Very useful for tabletop shots to get the focus plane exactly where you want it. Also for landscapes. Built like a tank, it even has coated optics. I paid £300 or so for a mint copy.
Zeiss 50mm f/4 on tilt mount, with Lee ND grad filter attached.
I buy a lot of lenses via eBay, especially the ones I don’t envisage using a lot. I paid top whack for my 14-24mm, new from Clifton Cameras as I do a lot of landscape work with it, however for macro, portrait and other speciality lenses, I can take the risk on a used one. The 105mm macro and 20mm AIS were sourced via eBay.
Tripod etc
My wife bought me a tripod for my birthday a few years ago, to hold a Fuji 9500 (looks like a really small DSLR). It was an ally and plastic Velbon one with a strange bracing thing at the bottom. The plastic bolt split the collar on the “head” however it still works and serves today as a Speedlight stand. It’s too heavy, and wouldn’t hold a small DSLR comfortably, let alone the D700 I currently use. When I decided to buy a “proper” tripod, I looked at Manfrotto, Gitzo, Giottos and Slik. I have a Slik mini which folds up really small and which I still use today on occasion. However Slik didn’t really make the sort of thing I was after back then – I needed a tripod that was:-
- Rock steady – so the fewer sections the better, and certainly no “column”
- Light – so carbon was really the only answer. Basalt is OK, but carbon is better. Forget titanium or aluminium for a full size tripod if you need to carry it for miles up mountains – they are too heavy.
- Versatile – high or low.
Gitzo make some fine tripods, however they seem deluded as to the value of 9 carbon sticks and some magnesium castings. Whole carbon bicycle frames can be had for less than the price some Gitzo tripods, and they have to withstand many times the force. They also lack the ability to get down really low and hang the camera underneath the legs.
Giottos, on the other hand offer kit that meets the brief for a third of the price.
 I mainly use a Giottos MTL-8361B which is a 3 section tripod with carbon legs. Very good value these. Light and versatile. I use it most of the time with the short mount (i.e. no “extension column”). It has a “boom” facility using the longer carbon extension column, and the ability to mount the camera underneath the tripod (between the legs). This can be useful for macro out in the field.
Giottos MH-1301 Ball head – without the 652 plate. I probably wouldn’t buy this head if I had to start again, as it came with a Giottos proprietary clamp and plate. The actual ball mechanism underneath is very good however and I’ve discarded the Giottos plate and replaced it with a Wimberly C-12 Arca clamp.
Kirk Arca L-bracket – allows for landscape and portrait positioning of camera without tilting the ball head. If you try portrait style shots by tilting the ball head over 90 degrees, you will soon get fed up of the camera creeping, especially during the twilight hour when exposures are around the 10 second mark. The weight of the lens twists the mounting plate on the camera, and because the weight is now offset on the tripod, it becomes unstable, and more prone to sinking on one leg in softer ground (on sand for example). Plus, you have to re-compose the shot changing from portrait to landscape and back. Using an L-bracket, you just take the camera off the clamp, and re-attach in the other orientation (it’s like having a tripod plate on the end of the body as well as underneath). The only other solution I’ve found to this is the Custom Brackets Pro-SV, which has the advantage of moving from landscape to portrait and back again without removing the camera, although this is a generic fit. The Kirk brackets are specific to a camera body and so grip it no matter what orientation you put it in.
Slik Sprint-Mini tripod and ball head. This tiny aluminium tripod and head is small enough to carry on your belt, and stands at chest height when the 4 section legs and column are fully extended. Its not the last word in stability with a 1kilo camera perched on top, however as long as you stick to mainly landscape orientation and small, light lenses it enables long exposures or perfect brackets for HDR in places where carrying a full sized tripod might attract too much attention.
My new travel tripod is another Giottos carbon one: the MT 8240B, this time with a Benro B1 ball head, again with an ARCA compatible clamp allowing me to mount the camera vertically. This is a bit bigger than the Sprint, and more stable.
Macro rail fro m China, via eBay. This is a great piece of engineering for the money. With a physically short lens (like my 20mm AIS or 50mm 1.8 ) on the camera, this macro rail will double as a panorama offset bracket, enabling you to rotate the camera around the front element. I got mine from HT-Photo in Shanghai, who also sell the marvellous Yongnuo flash guns.
Bags
LowePro Nature Trekker AWII – big, heavy pack – even when empty! Full back system. Now mostly houses my strobes and radio triggers.
LowePro Vertex 300AW – fits in airline overhead lockers (better airlines). Reasonable back. Still very heavy
LowePro Slingshot 200AW – great for family outings or when you know what to take.
LowePro Flipside 400AW – a smaller bag, less obviously a camera bag and it opens from the inner side (the side against your back when you’re wearing it)
Nikon XL concept shoulder bag (bit like a school satchel). I use this to carry my filters. On a landscape shoot, I will typically find a rock (out of reach of the tide if on the coast etc.) to put down my backpack. I’ll then go and set up the tripod and shot etc, which may end up some way from the bag. So I use this small shoulder bag to hold the filters whilst at the tripod. It’s a loose bag – so the filters can be lifted out with one hand and unwrapped – no fighting with “wallets”. I also keep an XXL fold Dry-bag in here along with my Bosch laser range-finder.
Lighting
Nikon SB-900 – A great light, full TTL, remote without additional triggers via Nikon’s light pulse driven “CLS” system. Strobes, zooms etc. Very expensive though, considering I mostly use it in manual mode on the end of a radio trigger. It’s mostly useful for remote TTL balanced fill flash jobs and I tend to use it in this mode, hand-held, with a small soft box attached for portrait shots out and about.
Yongnuo YN-460/II – I have 4 of these and they cost less than £25 each. They are basic manual flashes and work on any camera with a standard hot shoe. They will even trigger as an optical slave flash either from the main flash, or timed off the Nikon pre-flash codes from the master unit. GN of 33 for the 460 and 53 for the later 460-II ! Amazing. Unless you must have the flash on your camera or need TTL flash metering or the strobing and zooming of an expensive Nikon speed-light – get these 460-II’s. They are so cheap it’s rude not to.
My latest flashgun is a Yongnuo YN565EX. Up until this light was released, the only way to get *off-camera* Nikon i-TTL flashguns was to spend £350 on an SB700, 900 etc. The YN565EX does off-camera i-TTL for £100 per light shipped from a UK supplier. It works as part of a Nikon CLS lighting set-up. It won’t act as a master (you need the pop-up or a real Nikon Speedlight for that), however it zooms from 17mm to 105mm (SB900 goes to 200mm) and will strobe too!
I use the Interfit Strobies Speedlight accessory kits with my speedlights, although I’ve found better versions of most of the things im this kit now, including several pop-up softboxes for speedlights, mostly from Meking Studios in China
3 Lencarta 600-SFs. My new studio lights – very fast, and with zero recycle time if you use them at 1/4 power or less, they can fire along with the camera on continuous shooting. Very good at stopping action.
Modifiers: I have 120cm octaboxes, strip-boxes for full length people lighting, and various other soft-boxes. Wide angle (beauty dish), and long-throw (maxi-light) reflectors, grids, snoots, barndoors etc.
Coloured gels for speedlights – some specific warming and cooling gels, and some pretty colours. I stick these to the flash guns by mounting small Velcro pads on the guns and on the gels. I use these less and less these days now I have the option to blend and colour light sources in Oloneo Photo-engine for still scenes.
Radio triggers. I’m currently using the excellent Yongnuo YN622N and TX triggers on my Nikon Speedlights – full TTL, remote adjustment over radio – no more line of sight! I’m using the Lencarta Wavesync on my 600-SFs which also allow remote power adjustment. I use big clamps from Viewfinder that are very much like the Manfrotto “Justin Clamp”. These are great and allow clamping of speedlights just about anywhere there’s something to clamp them to. Manfrotto don’t seem to sell the Justin Clamp in Europe and to ship them over from the USA, the cost is just daft at around £70 per clamp. Viewfinder’s clamps are £18 each. They have a ball joint mount for the speedlight allowing you to point it pretty much anywhere.
Umberellas – various white and silver, some with black backing to prevent light spill and others that are “shoot- through”: that is, crude wide-angle soft-boxes. These range in price from £12 to £50 for the 2m silver reflector.
LED Head torch and hand held LED torch – mainly for setting up in the dark on landscape shoots.
Other “Studio” stuff
A heavy duty background support, white muslin background and a grey vinyl background that comes on an aluminium tube. A bit cumbersome to set up as it’s very heavy, however the results are good from the matt textured grey material. Grey is definitely the one to go for if you only buy one background. You can use this as a white, grey or black background, depending on how much light you throw on it, and it will produce a nice, even coloured background if you light it with coloured gels. Bessel are great for this sort of stuff and for large soft boxes.
Light duty light stands for speedlights, heavy duty ones for mono-block mains lights. I also use a counterbalanced boom stand to place lights over head of the subject without the stand in my way. I also use a raft of flexible pop-up reflectors with multiple surfaces (silver, white, black, gold etc). These are useful for so many things from adding fill, to acting as “flags” to block light from the background or from entering the lens directly from the light and causing flare. I also use them as diffusers with multiple speeedlights behind them out in the field.
Tracing paper – 1 metre wide on a roll – for tabletop diffusion
DIY shooting table – using a light mounting wall bracket in a studio stand, with a chipboard top on it.
Laptop stand – similar to shooting table.
Control My Nikon – drive your camera from your laptop for precise focussing, live view to the laptop screen, and automated focus stacking.
Filters
Lee SW-150 kit plus 0.6ND, and 0.9ND hard grad. These are for the 14-24mm lens, are huge and take 5 minutes to assemble including the rear baffles to stop reflections in the filter.
Lee 100mm holder. Set of hard ND grads, a 0.9ND, 06ND soft and a 10 stop 3.0ND “Big stopper”. These will mount on all of my other lenses, and work well. Lee ND filters cost a bit more than others, but are generally good quality, if a bit thin on the ground these days. Note the larger value ND filters are not that neatral, and the amount of light they stop is also a bit variable (my 3 stop is more like 5 stops). Polarisers – mostly Hoya Pro1 (mid-range). Useful to see the driver in closed cab racing, as it cuts out reflection on the windscreen, although I find I rarely use these now.
Protectors – I use these mainly to keep sea spray off the lens.
Lee adaptor rings – one for each lens. You could be forgiven for wondering why speed may be an issue for landscape shots, however that “golden hour” goes past really fast – especially when the best light may only be around for a few minutes. If you need to change lenses halfway through then having the adaptor ring already on the lens can save a minute or two of locating and attaching the filter ring. Note you don’t need the plastic Lee lens caps -most lens caps will attach to the filter ring, with the notable exception of the wide-angle rings.
Odd and sods
Hot shoe spirit level – for a straight horizon, and to get the camera level along the lens axis, if you need to make sure your verticals are er.. vertical.
Hama remote cable release. Once again, why pay silly money when a £10 item will do the job just as well? My Hama remote has been through 2 cameras, and been dunked in freshwater and seawater and is still working well. The button will activate the AF etc. on a half press, and locks for long exposures on “bulb” mode so you can walk away and make a cup of tea. I have a more complicated remote that will time long exposures now, saving me the bother of using the stopwatch function on my iPhone.
5-in-1 reflector/diffusers. Small and large circular reflectors with white, gold and silver surfaces. They also act as a diffuser, or black disc. I often use these as a base for shots of small objects. You can light it from underneath to get a clean white background. They are relatively inexpensive from shops like 7-dayshop at around £15.
XXL DryBags. These allow me to take pictures in the fleeting but striking light that can appear in the breaks in storms. I set the camera up on the tripod, complete with filters etc. Compose the shot and cover the whole lot with the DryBag. wait for the light, whip off the bag, take the shot and re-cover. I also keep my filter bag inside one when it rains. Tescos sell these or you can get them from Speedgraphic.
 My latest bit of gadgetry is a Lens Skirt. It’s a simple idea and is basically a large cloth “hood” with suckers at each corner. You use these to attach it to windows and out the lens in the other end and pull the draw-string tight. It cuts out reflections when taking shots from inside a lit room at night. If you’re lucky and your hotel affords a good view over the city you are in, you can use this to get clear shots as most hotel windows don’t open these days. You could just use a t-shirt, but this is just easier, as you can move the camera about to compose the shot and the skirt stays in place. Buy from 7-day shop in the UK
BOSCH PLR-25 laser range-finder. I use this to measure the distance to the nearest thing in my shot – on landscape shoots. I want everything to appear in focus (i.e. more in focus than the worst link in the chain – camera to viewer’s eye, can resolve). Once I know the distance to the nearest object, I can calculate the distance I need to focus the lens at and the largest aperture I can use to get all of the shot sharp front to back. I then use the range-finder again to find an object the correct distance away from the camera, use the AF to focus on that and then switch the lens to manual focus, locking the focus at my calculated distance. You can buy these from Amazon. I’ll write more on this, the “Circle of Confusion” and the Hyperfocal distance soon, with posts on some of the other bits of kit too.