Ever fancied yourself as Red Sonja?

Or Xena? On the 25th and 26th of March I’ll be down at TBG Studios in Newmarket shooting clients in this style. This shoot is part of a women’s empowerment day and is open to any woman: you don’t need to have any modelling skill at all and I guarantee we’ll make you look like a fighting fantasy! This event is the work of Gina Feather, a model who is passionate about demonstrating that models look impossibly good in photos because of great posture, makeup, lighting and re-touching – and that women should not compare how they look every day to these ideals. As a participant on this shoot, we aim to let you see that you too would look just as amazing when given the same treatment!

The finished images are printable at full detail up to 1m high, and you can either get them printed yourself, or we can have them printed for you, with hangers, frames, or as a canvas or aluminium print.

Email ginafeatherbusiness@gmail.com to book your place.

Using CGI In your Images

Over the last couple of years, I’ve moved more towards the “digital art” end of the spectrum with my photography. I still use a lot of on-set effects such as fog, camera movement with long exposures, props/sets and dramatic lighting, however I started adding in more elements in the post-production phase. I’ve been adding textures to walls and floors for years but I’ve recently started adding more and more effects in post. I think it started with the cosplay shoots. These really needed some sort of setting and the characters often went hand-in-hand with effects such as energy weapons, lightning and so on. You can see a good example of what I mean in the last post “Shooting for Post-Production”, where we shot and produced a mock movie-poster for a an imaginary She-Ra movie.

Wings in Daz Studio using the iRay preview mode
Continue reading

Shooting for Post-Production

There are many types of photography, where you really don’t want to be messing around “editing” things post-capture (I mean other than the usual tone and colour adjustments to compensate for any technical shortcoming in the camera), images where the content is the main element – life, travel, social commentary are “of the moment” and show something real. This is not what I’m talking about here. What I’m presenting involves the use of a camera, to capture all of the “assets” required to make a final image that is more at the “art” or creative end of the spectrum. I find it useful to think about this in terms of movie making. The techniques are very similar in many respects, although there are things we can do to a still image, post production (ie after we shoot), that are more difficult to do in a movie. There are also practical effects on-set that are much easier and cheaper to produce for a still photograph.

Continue reading

Landscape with Lighting

Fancy a trip to Skye next March? We’ll be shooting the landscape, but with figures in it – with outrageous ballgowns, and flowing fabrics. Using long exposures to provide movement trails from the gowns, fabric, hair, and water and location flash lighting to illuminate and freeze our models. Contact https://www.instagram.com/everlyrosemodel/ to book your place, or message me. There are two 3-day sessions – with 3 attendees per session.

No, taking away blue does not add yellow

This is another of those concepts I keep seeing presented in videos.  Videos by respected and knowledgeable photographers and re-touchers, who otherwise demonstrate a complete and thorough understanding of the concepts they are explaining.   For some reason though, they often have a blind spot when it comes to this one. It’s one of those where for most images it probably doesn’t matter too much if you don’t understand what is truly happening  however it makes my eyes twitch (in a sort of Herbert Lom in the Pink Panther sort of way) whenever I hear this being said, so here’s my $0.5 worth on the subject 🙂

It concerns making adjustments to colour in an image usually using the curves adjustment tool (but is true of any tool that changes the brightness levels of individual colour channels).   I’m going to demonstrate using curves.  The claim, is that by lowering the contribution of one colour channel you increase the contribution of the opposite colour channel.  The curves tool in Photoshop allows for adjustment of the Red, Green and Blue (RGB) channels separately and for all three together  (for an overall adjustment in brightness).   This leads to questions about adjusting other colours such as Yellow.    Red, Green and Blue are the opposites of Cyan, Magenta and Yellow:   RGB is the opposite of CMY, and C, M and Y are made from mixing R, G and B.   This is all good, however every explanation I’ve seen online then goes off the rails.   Let’s take Yellow as the target colour channel you need to increase.  There is no Yellow colour channel in the curves tool (or levels etc).  All the tutorials I’ve watched on colour tell you to do this by reducing blue.  This will not work, and here’s why:-

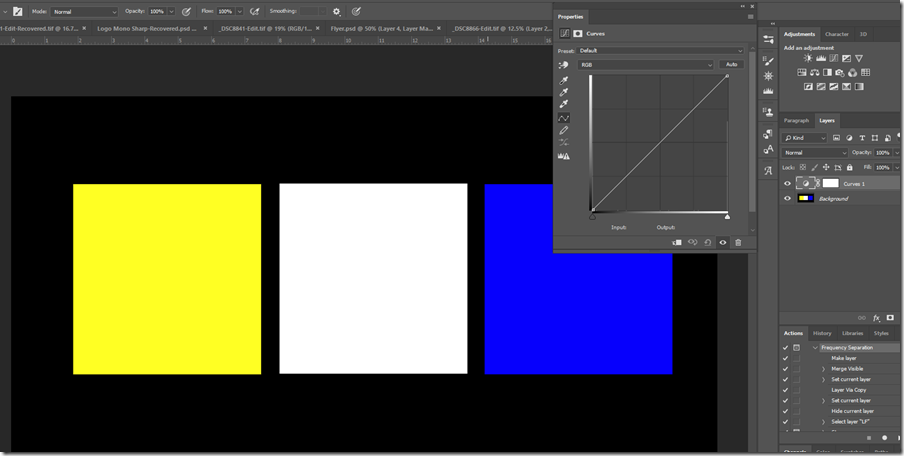
Here’s the test bed we’ll be using to explore this:  I have a black background (so no brightness at all in either red, green or blue).  We have a Yellow patch, a white one and a blue one.   I’m going to use a curves adjustment to increase or decrease the contribution of each colour channel and in this control image you can see it’s completely linear in all channels  (and so having no effect).
image

Continue reading

Project Noir part II

_OHL4540-WebsiteThis time we concentrated on one shot – a backlit interior concept with volumetric light (i.e. light given volume by some medium – in this case, an even fog).  Caspar reprised his previous outfit, now complete with a nice black Fedora.   I found some 20 year-old Gauloise Caporal white cigarettes when we moved house last year that really looked the part in a soft blue case.    We also had a crystal decanter, glass, and the airgun we used on the last shoot. All of these went onto a nice period desk from another room in the old manor house.

Continue reading