Product photography can get very involved. Managing reflections, especially on shiny surfaces means you need to be very careful about that is in “sight” of the product surface. Glass is double trouble, as every piece of glass has 2 surfaces – inside and out. I’ve recently started to dabble in this and looked around for some ideas. 2 great places to go:- photigy.com and Karl Taylor Photography.
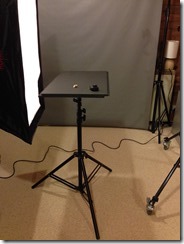
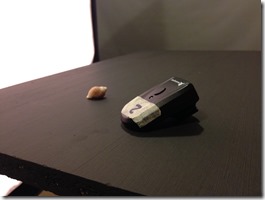
 I recently built a shooting table that fits onto a standard light stand. This was an idea I picked up from Alex Koloskov – a commercial product photographer in the USA and the owner of the photigy.com training web site. It’s made from a piece of loft boarding, and a lighting wall plate, designed to mount a studio strobe on the wall or ceiling. Bolt this to the board,
  remove the spigot from the top of your stand and it slots right in. So now I have a table that rotates and can be adjusted in height. I painted it in blackboard paint which will help to eliminate stray light and actually makes quite a nice surface to shoot on in it’s own right. For most jobs though, I will be placing another surface on top of it.
For this job, I bought a 1 metre by 0.5 metre piece of 5mm thick black acrylic (Perspex). It gives very clean reflections – and most importantly, unlike glass, only one reflection. Glass (and mirrors) have 2 surfaces and produce 2 reflections, one offset from the other which doesn’t look good. You can also use glossy ceramic floor tiles, polished granite or other stone or polished metal. The rest of the first setup I used things I already had – 2 soft boxes , a grey vinyl backdrop, and a large pop-up diffuser.

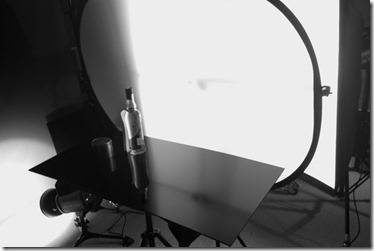
 You can see the set up below – a strip box behind the diffuser next to the bottle, and another rectangular soft-box on the right, also behind the diffuser. You need the diffusion to get a nice graduated light on the bottle edge – a “bare” soft box will give a sharp reflection of that box in the glass.. This gave the result on the right. Well, it’s ok, however it’s a bit “busy” and the highlight on the right of the bottle is still a bit harsh. I needed more diffusion, and a big diffusor, without a black edge around it!. Tracing paper seemed the best answer and I bought 20 metres on a roll, just over 1 metre wide. To suspend the paper, I put up 2 lighting stands and mounted a super clamp on the top of each stand (these clamps accept a standard lighting spigot). I then put a 3 metre length of 21mm doweling rod into the jaws of the clamps – to hold it up at each end. I then cut 2 lengths of tracing paper long enough to drape over the pole and hang down beneath my shooting table. I hung the 2 pieces side by side, slightly overlapping in the middle. I attached plastic A clamps to the bottom edges of the paper to weight it.
  This gave a cleaner result and although there are still things to fix I quite like this one. There is a quite a focussed reflection of the paper on the side of the bottle on the left, which needs to go. I also shot this one lower which has eliminated the dark reflection of the acrylic in the bottom left of the first image.
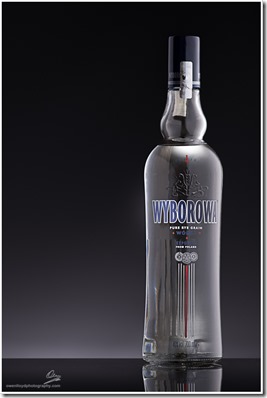
 However, I didn’t take this one any further as I had seen another lighting style that I think suits the cool, clear mood of a Vodka bottle better. It still has a strip box and tracing paper to the right for a graduated reflection, however it is backlit through another tracing paper wall with a strobe fitted with a standard reflector and a 20 degree grid to produce the sixe of spot I wanted. I put up another small stand, this time with a mini boom arm on it, fully extended to hold another 1 metre wide strip of tracing paper at right angles to the first – at the back of the shooting table. I attached a super clamp to the short end of the boom as a counterweight. Also on the table you can see a YN460-II speed-light with an Interfit snoot on it. I used this to pick out highlights on the bottle, triggering it using the built in slave cell – so it fires when it sees the light from the main strobes. I also used a piece of white card to produce a reflection on the left hand side of the bottle neck and cap. As you can see, the card and the snoot are in the shot – I needed to get this close to focus the light only on the logo, and to get a strong enough reflection from the card. These 2 extra shots were layered on top of the main image in Photoshop and masked off. By painting a hole in the mask with a soft edged brush I can get the highlight to show through, without seeing the light or card in the final image.

 I played around with the position of the bottle, the amount of acrylic sticking out behind the bottle, and height and angle of the back-light to get the nice graduated circle of light behind the bottle. I wanted to eliminate the black acrylic surface from reflecting in the bottom of the bottle, and at first, tried to do this by spilling light from the background light onto the surface to make it light. This did not work. However the solution was to simply lower the camera. This meant about a quarter of the lens was now below the acrylic base, however it had the desired effect of merging the background light into the base. for a seamless effect – rather like the bottle is suspended in this light-field. Only the bottle’s reflection gives away the fact that there is a base it’s sitting on.
Post processing consisted of setting the black and white points in Lightroom, along with cropping. This only needs to be done on one image in a set, and then sync’d to the others. I then opened the set of images (one base image, one with logo highlight and one with card) as layers in Photoshop. Each highlight is revealed by brushing away the mask on the 2 highlight images. I then applied my usual background blurring regime, and pasted the bottle back on top. I did fade the edges of the sharp bottle in places though as this just looked better. I kept the sharp edge at the top and bottom. Sharpening consisted of an unsharp mask filter at 100%, radius of 1 and threshold of 3; plus a high pass layer at 1.5 pixels blended with soft-light, to pick out the edges. I applied vignette back in Lightroom, and did some final clean-up of dust spots and a minor tweak to the white balance to make it appear less blue and more neutral.
I also found another bottle of Vodka at the back of the cupboard – with some nice shiny labels. This Smirnoff Blue bottle has a label on the back though, so I do need to remove that and give this one a another go at some point. i also needed more layers – as I shot a highlight frame for each label – top, middle and bottom.
Full kit list for this shoot:-
Nikon D800E
Nikon 180mm f/2.8 AF-D and 85mm f/1.8 AF-D lenses
Giottos tripod and Kirk L bracket
3 x Lencarta SF-600 studio strobes.
3 x FT-16 triggers (allow full remote control of the SF-600’s including turning the modelling light on and off)
1 x Yongnuo YN460-II speedlight
Interfit “Strobies” snoot
Roll of 1016mm wide tracing paper
Floor stand
3 x heavy duty light stand (one holding the table up)
3 x lightweight light stands for the tracing paper
3 x Karlite superclamps
1.5×1 metre 5mm thick acrylic slab
White A4 card
Yongnuo radio remote trigger for Nikon cameras
Sekonic L308s light meter.
Some nice bottles 🙂


I am truly in awe, at this product shots professional treatment and comtrol of the glass subject matter.
Excellent stuff Owen.
Thanks for sharing, I am looking to make a shooting table like you. Are you able to share a link to the lighting wall plate you used? thanks
Hi Matthew – this isn’t the one I used, but it’s the same sort of thing:-
https://www.ebay.co.uk/itm/Photo-Studio-Lighting-Wall-Plate-Mini-Light-Stand-Baby-Plate-6cm-High-Quality/281487832829?epid=1563444281&hash=item4189fb76fd:g:7SIAAOSwGBhaaD6A&frcectupt=true
They are generally known as “baby plates”.